Wednesday, July 27, 2016

git workflow to contribute to open source project

Introduction

Git is a nice version control tool to work with, but how to use it collaboratively with others, and contribute to some open source project using git has a steep learning curve, here, I will summary the main steps how you can contribute to a project.
There are many ways you can work on a forked repo, i.e. you can either clone it to a virtual environment, or copy it directly to you machine and add it to your path. I like to clone the repo directly to my mac, and work inside the folder. Here, I will give a summary of my work flow when contributing to open source projects. I will use Folium as an example.

Work flow using GIT

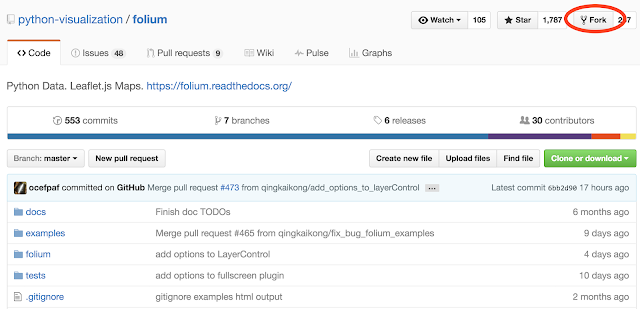
(1) Fork the project on the github website

Press the button on the upper right corner (circled by the red), then you will have this repo in your account, it is more like copying it to your own collection, so that you can mess up with it ) without changing the original repo.


(2) git clone the forked repo to your machine

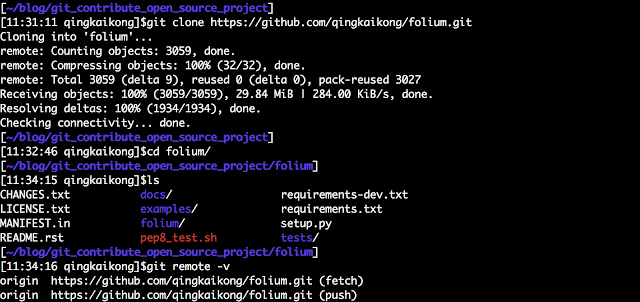
After you forked the project to your own github, you can now create a version on your laptop. Note: we clone the repo from the forked version, this will copy the repo from your github to your machine for you to work on.
git clone https://github.com/qingkaikong/folium.git
cd folium
git remote -v


(3) Install the package and dependencies

I usually install the project using pip, and work with the modifications inside this folder. (You can also add it to your path). Note: You also need install the dependencies manually.
# inside the project folder
pip install -e .


(4) add the upstream repo, this will let you to sync with the latest update

Up to this point, we have two copies of the project, one is on your github repo you forked, the other is the one you downloaded to your machine. You can see after you do a git remote -v, it shows your original repo is from ’https://github.com/qingkaikong/folium.git', we need build a mechanism that our repo can link to the original repo, so that we can synchronize with the latest changes made by others. To do this, we add the address point to the original repo, we call it ‘upstream’.
git remote add upstream https://github.com/python-visualization/folium.git
git remote -v


(5) Work on a new branch

Never work on the master branch, but a new branch related with the problem. The reason we work on a new branch will be shown later.
git checkout -b fix_some_problem
git branch


(6) Finish the modification, add and commit

Now you can work on the problems you are interested in. After you finish the modification, you can add the changes, and commit it as you usually do.
git add Some_changes
git commit -m 'add changes XXX'

(7) Sync with the upstream master before you push

Since others may also work on this project, and merged some new things into the upstream master already, you need sync with the upstream master before pushing to avoid conflicts.
# this will get all the latest updates from the upstream repo
git remote update
# let's rebase to apply these latest updates to our repo
git pull --rebase upstream master


(8) Push to your remote repo and create a Pull Request (PR)

Now you can push the changes to your github, and after you do that, you can create a pull request from github.
git push -u origin fix_some_problem
# or you can simply 'git push' and follow the instructions from git

(9) Make more changes after PR created

After you created a PR, anything you commit in this branch from now will be attached to the current PR. For example, if you make some changes to a file, and commit it as ‘commit A’. This commit A will automatically attached to this PR when you push it to github. Therefore, a rule is that: a single branch, will be a single PR. And now, if you want to make some other changes, you should make a new branch from the master (Note: make a new branch from master! Not from current branch). If you create a new branch from the current branch (fix_some_problem branch), any commit will be attached to the PR created from this ‘fix_some_problem’ branch! This is why never work on the master, keep it clean as a base for other modifications.
git checkout master
git checkout -b fix_a_different_problem

Some notes before create a PR

These notes are part of my workflow as well, it is aimed to create better and clearer PR.

Check your code before you create a PR

It is good practice to remove all the unnecessary spaces in your code, you can do this using git show, and the red boxes indicate that you introduced unnecessary spaces that you need delete them.
# after you commit, you can check with git show
git show

Squash your commit

Now we see this red boxes that we want to remove it. But you don’t want to commit one more time with ‘remove unnecessary spaces’, since the commit is to show a history of important changes. So the best way to do it is to squash the commit you will make, to do this:
# after you commit, you can check with git show
vi README.rst
# make changes
git add README.rst
git commit -m 'abc'
# show the log history
git log
The reason we commit with ‘abc’ is because we will later squash this commit into the previous one, so the name here is a placeholder that will be removed.

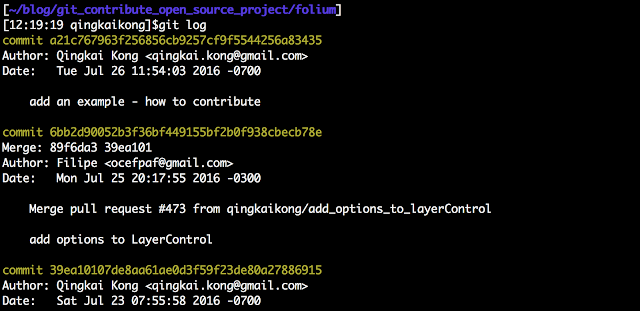
We can see the following log with the remove spaces fix - ‘abc’, so we want to squash it to the previous commit - ‘add an example - how to contribute’. We want to do a interactive rebase from the commit that circled by the red.

# Let's squash the last two commits
git rebase -i 6bb2d90052b3f36bf449155bf2b0f938cbecb78e
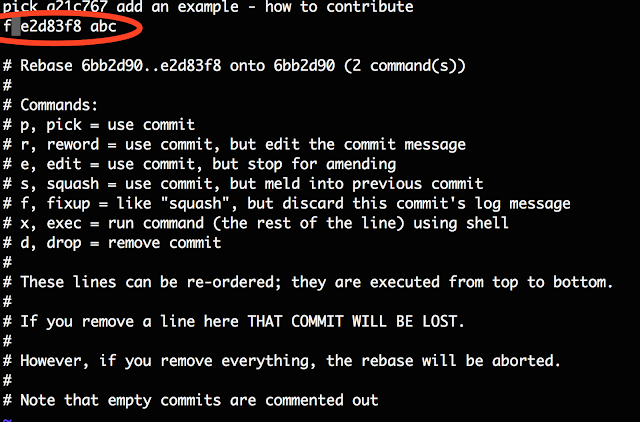
The interactive rebase will open the vi editor for you to compile. You can see the top two lines with the last two commits we made. And git gives you command options in the bottom, all you need do is to change the pick to the command you want.

The options are clear, we can either choose ‘s’ to squash, and then delete the 2nd commit, or just fix it using ‘f’, which ignore the 2nd commit. Let’s change this in the editor by change the ‘pick’ to ‘f’, and close the editor (see the red circle in the screenshot).

The following is the screenshot after you close the editor:

Now if you check git log again:

Acknowledgements

I learned most of my git skills from:

Wednesday, July 20, 2016

Create Personal Website with Pelican - Part 2

Let’s continue to build a personal website from the part 1 of the blog. This week, we will see how to change to a different theme, add images, videos, attach files, add google analytics, and publish the sites. The generated site files can be found at Qingkai's Github.

Change a theme

You can change the theme of your website. You can either create your own theme, or there are already many existing themes that you can use, see these nice themes. I won’t bother to create my own theme, so I will use the existing ones. You can have a look of different themes. Now, let’s start to change themes. All you need do is to download these themes, say I store it in my Download folder. If I want to use a theme, for example, ‘subtle’. I can follow the steps:
# this will install the theme
$ pelican-themes -i ~/Downloads/pelican-themes-master/subtle
# list all the themes on you machine
$ pelican-themes -l
# use the theme
$ pelican content -t subtle
# Now you should see the change of the theme on your website (reload if you don't see it).
Note: If you want to change something on the theme, before you install it, go to the folder and change the html template or the css files.

Add an image or video

Adding an image or video is simple, just add the html code into the markdown file, then you will have them, all you need do is to adjust the alignment and position.
Add an image
<img align="left" src="./images/iron_man.jpg" alt="Drawing" style="width: 200px;"/>
Add a video:
<div style="margin: 0px auto; text-align: center;"><iframe width="560" height="315" src="https://www.youtube.com/embed/WSYRkTTcEg0" frameborder="0" allowfullscreen></iframe></div>

Attach file

This is how you attach a file:
You can download iron man's image [here]({filename}../images/iron_man.jpg)

Add Google Analytics

Add google analytics to track the visits of your site is quite simple in pelican, all you need do is to change the trackID field GOOGLE_ANALYTICS in the publishconf.py file. To get the track ID from google analytics, you can follow the steps here

Publish your site

There are many ways to publish your site. I am using Fabric to publish my site. Change the remote server configuration in the fabfile.py:
# Remote server configuration
# this is your remote server address and port
production = 'username@XXXX.XXX.berkeley.edu:22'
# this is the folder contains all your site content
dest_path = '/home/kongqk/public_html'
Ok, you almost done, after you modified your site, and you can publish it using:
$ fab build
$ fab publish
# then type your loggin information!
Finally, we are done, and now you can enjoy your personal website. This is a quick way to build a nice simple website, and hope it is useful to you. 

Wednesday, July 13, 2016

Interesting Things I Learned at SciPy 2016

I am currently at Scipy 2016 conference, so this week's blog I will try to list some of the interesting things I learned from Scipy conference. The conference is from July 12th to July 17th at Austin TX. Here are the interesting things I learned:

July 13th 2016
Jupyter dashbord - Extension for Jupyter Notebook that enables the layout and presentation of dashboards from notebooks.

Jupyterlab - A computational environment. This is a very early preview, and is not suitable for general usage yet. But nice to checkout now.

altair - This is a declarative statistical visualization library for Python. 

geopandas - GeoPandas extends the datatypes used by pandas to allow spatial operations on geometric types.

yt - A python package for analyzing and visualizing volumetric, multi-resolution data from astrophysical simulations, radio telescopes, and a burgeoning interdisciplinary community.

Glumpy - A python library for scientific visualization that is both fast, scalable and beautiful.

tpot - A python tool that automatically creates and optimizes machine learning pipelines using genetic programming.

The best part of today's conference is that I talked a lot with Sebastian Raschka about Machine learning, and he gave me many great suggestions ^)^ Check out his book if you want to do machine learning with python - Python Machine Learning, which is a very nice book if you want to do machine learning quick.

July 14th 2016
HDBSCAN - Hierarchical Density-Based Spatial Clustering of Applications with Noise.

lightning - A framework for data visualization providing API-based access to reproducible, web-based, interactive visualizations.

binder - Turn a GitHub repo into a collection of interactive notebooks. 

cesium - Open-Source Machine Learning for Time Series Analysis. 

dask - A flexible parallel computing library for analytics, it can 'deal with' big data even on a single machine. 

simpeg - An open source python package for simulation and gradient based parameter estimation in geophysical applications. 

steno3d - Visualize 3d data, but it is not free if data size over certain limit. 

Intel Python distribution - It is said to boost the performance of the packages. 

HPX-5 - A distributed programming model allowing programs to run unmodified on systems from a single SMP to large clusters and supercomputers with thousands of nodes. 

loopy - A code generator for array-based code in the OpenCL/CUDA execution model.

mplstereonet - Provides lower-hemisphere equal-area and equal-angle stereonets for matplotlib.

Sensor Data Management System - Public sensor data. 

resampy - Efficient resampling for the audio data. 

datalore - An intelligent, cloud-based computational workbook with collaborative support. (require sign up). 

sharedmem - A different flavor of multiprocessing in Python.

July 15th 2016
datashader - A graphics pipeline system for creating meaningful representations of large amounts of data. 

canopy-geo - Python-based analysis environment for geophysics.

ipywidgets - Interactive HTML widgets for Jupyter notebooks and the IPython kernel. 

nbflow - A tool that supports one-button reproducible workflows with the Jupyter Notebook and Scons.

auto-sklearn - An automated machine learning toolkit and a drop-in replacement for a scikit-learn estimator.

hyperopt-sklearn Hyperopt based model selection among machine learning algorithms in scikit-learn.

spearmint - A software package to perform Bayesian optimization.

scikit-optimize - A simple and efficient library for model-based optimization, accessible to everybody and reusable in various contexts.

symengine - A fast symbolic manipulation library, written in C++.


nbdime - Tools for diffing and merging of Jupyter notebooks. 

flexx - Write desktop and web apps in pure python.